1. Introduction :
MrEd Designer is a GUI (Graphical User Interface) generator for PLT
Scheme, which I developed as a school project at the University of
Nice in 2004. It is inspired from
the Qt
Designer, a program that makes it possible to easily develop graphical user
interfaces based on the multi-platform Qt classes (in C++).
I tried to make MrEd Designer as powerful, bug-free and user-friendly
as I could. If you have any comments, ideas, bug report, please check
the « Contact » section of this website to contact
me.
2. System Requirements :
MrEd Designer should work on Windows, MacOS X and Unix-like systems.
I tried to minimize the number of OS-dependant bugs. The GUI controls
look similar to Microsoft's Visual Studio's, but they should look fine
under any operating system or theme.
I recommend a resolution of 1024x768 or higher because the different
windows take a lot of much space on the screen.
3. Files :
To start MrEd Designer, just launch the main.scm file with DrScheme.
To improve performance, you can launch the compile.scm file to compile the
project into .zo files.
4. The Graphical User Interface :
The program's graphical user interface is pretty self-explanatory.
The user can create frames, containers, buttons in a WYSIWIG manner,
and then ask the Scheme code to be generated, either into a file or
in the console.
4.1. The Toolbox Frame :
Here is a screenshot of the Toolbox Frame :

The Toolbox Frame, under Windows
The Toolbox Frame allows you to create frames, containers,
and other widgets. When you choose to create an element, its parent
is the currently selected element in the Hierarchy frame. Of course,
you will not be able to create an element whose parent is not a container,
or a frame whose parent is not either the project root or another
frame.
Closing the Toolbox Frame will also close the application.
The « Generate Code... » button allows you to
Generate the code for your project, either in a new file or in the
console :
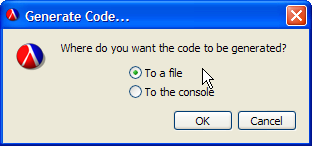
Where do we generate the code?
If you choose to generate the code into a file,
a prompt will appear to ask you where you want to create the file.
If you choose to output the code to the console, it will simply
appear in the application console.
After having generated the code, just open the file with DrScheme,
and run it. The resulting application should launch windows containing
the various widgets you created through MrEd Designer's GUI.
4.2. The Hierarchy Frame :
Here is a screenshot of the Hierarchy Frame :
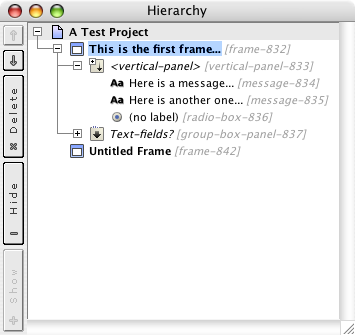
The Hierarchy Frame, under MacOS X
The Hierarchy Frame contains the hierarchy of all
the project's elements. The project name and the windows are displayed
in a bold font. The other containers are displayed in an italic font.
Others widgets are displayed in a normal font. You can minimize an
element that have children by simply clicking on the little « - »
at the left of the element name, and vice-versa.
The element's id (i.e. the name it will have when the code is generated)
is displayed in a gray italic font, between square brackets at the right
of the element name.
There are five buttons on the left of the main widget.
- The up and down arrows allow you to move up and down an element
among its siblings : the preview is automatically updated in consequence.
- The delete button allows you to delete the currently selected element
(the preview will be automatically updated). You can delete
an element which has children – and then delete the children,
too, but to do so you will have to confirm your action (when the users
tries to delete a parent element, a prompt appears asking whether he
is sure he wants to delete the element and all its children).
- The show and hide buttons are only enabled when the currently selected
element is a frame – if the frame is hidden, then only the show
button is enabled, and vice versa.
This window is fully scrollable, vertically and horizontally. If you
closed this frame, you can reopen it via the « Windows »
menu.
4.3. The Properties Frame :
Here is a screenshot of the Properties Frame :
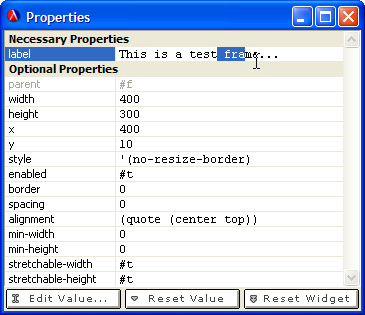
The Properties Frame, under Windows
The Properties Frame allows the user to edit each property of the currently selected element in the hierarchy frame. You can edit each property by typing directly in the right field, and then validate the property either by pressing return or by clicking in another line in the window. The preview is automatically updated, but internally how the program does this is quite complex, because while certain properties can be updated thanks to modifiers, some properties need to destroy and recreate their widget. Even worse, it is not possible to change the « choices » or « style » property of an element without reloading the whole project. Reloading the project usually takes less than half a second but for very big and complex projects, it might take a while. This is why, if you try to change the « style » or « choices » property of a container you will get the following warning :
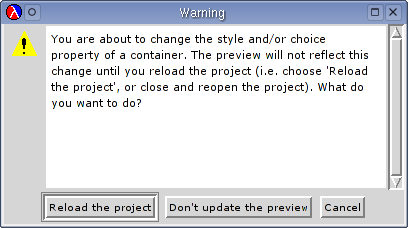
A prompt under GNU/Linux
Using the properties frame is pretty self-explanatory.
Just edit the properties, just as if you typed them directly
in the code. They will automatically converted into the right type.
For example, using the value '#f' will automatically be converted into the
#f boolean.
The frame is vertically scrollable, and provides the ability to select,
to use the 'left arrow', 'right arrow', 'backspace arrow', etc., keys into
the different fields.
If you closed this frame, you can reopen it via the « Windows »
menu.
There are 3 buttons at the bottom of the Frame :
- The « Edit Value... » button makes it possible to edit
the current value with a message box instead of typing it directly
into the currently selected field.
- The « Reset Value » button resets the currently
selected value to its default value.
- The « Reset Widget» button resets the whole widget
to its initial values.
4.4. The Preview Manager :
Most frames of MrEd Designer are created by the preview manager : when the user
adds a frame to the project, containing widgets, it appears
on the screen just as it will when the produced code is executed.
Here is a screenshot of a sample use of MrEd Designer under MacOS X :
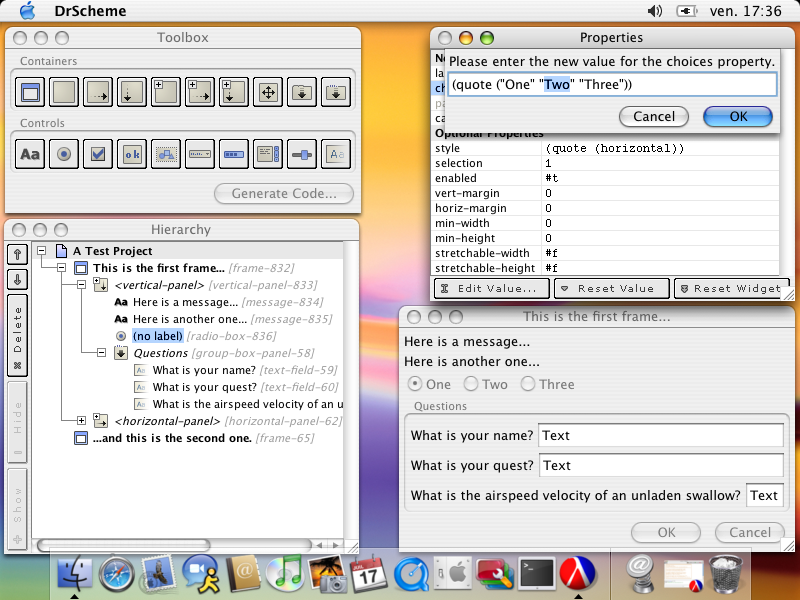
The MrEd Designer workspace, under MacOS X
4.5. The Menus :
There are four different menus. They are located in the Toolbox Frame,
therefore, on MacOS X, they will only be visible if the Toolbox Frame
is the focused window.
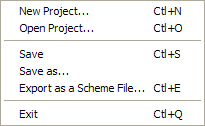
The File Menu
- The « New Project... » item
makes it possible to create a new project, and it will ask whether you want
to save the previous project if any changes have been made since last
change.
- The « Open Project... » item makes it possible to
open a previously saved MrEd Designer project (*.med). It loads it
into memory and updates the preview.
- The « Save » item makes it possible to save the current
project without creating a new file...
- The « Save as... » item makes it possible to save
the current project into a new file.
- The « Export as a Scheme File... » item generates
the source code for the project and saves it into a scheme file (*.ss
or *.scm).
- The « Exit » item quits MrEd Designer (the
same effect as manually closing the Toolbox Frame).
The edit menu only contains disabled elements (even if it is not disabled
itself), this menu is only present to comply with the user interface guidelines.
![]()
The Windows Menu
This menu is self-explanatory : it makes it possible to show or hide the Hierarchy Frame or the Properties Frame.
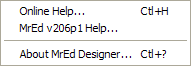
The Help Menu
- The « Online Help... » item
brings you on the support page of the MrEd Designer website (i.e.
http://mreddesigner.lozi.org/).
- The « MrEd v206p1 Help... » item brings you
on the MrEd
v206p1 documentation from the PLT
website.
- The « About MrEd Designer » item opens the
About Dialog.
4.6. The About Dialog :
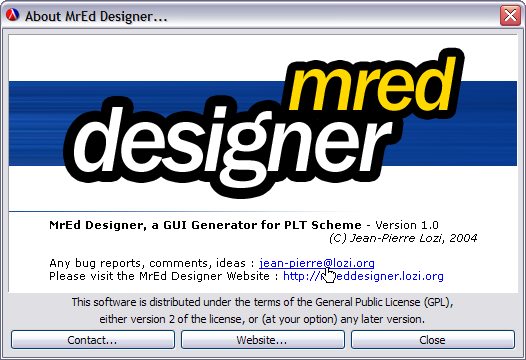
The About Dialog, under Windows.
As you can see on the screenshot, MrEd Designer is distributed
under the terms of the General Public License (GPL).
5. Conclusion :
MrEd Designer makes it possible to design GUI very easily in a WYSIWIG fashion. This
is the first release, but I will try to update it as often as possible.
If you have ideas, or suggestions, please visit the « Contact »
section.